AWS Cognito: Improving System Resilience While Being Commercially Reasonable
In current technology driven world, we might all have felt overwhelmed at some point or other, with the huge number of passwords one must keep in mind. Haven’t we felt that so-called “Password Fatigue”? The fact that most of data breaches ultimately point their fingers at weak, often reused and stolen passwords, is strong enough emphasis of how important the matter is.
Now when we consider the other side of the coin, that being application development the story is no different. Access control is often the most complex, yet significant task faced by every application developer. We believe that an application developer has better things to spend their energy on than figuring out how to they can implement access control. Which is exactly why there are frameworks and services that can perform that task for you.
Her we are going to discuss implementation of an access control with AWS Cognito; an access and identity management service from Amazon Web Services.
AWS Cognito: What?
AWS Cognito can be pretty much summed up as a reliable and scalable AWS service for authentication, authorization, and user management. Amazon Cognito has two sections being:
- Amazon Cognito User Pools – Which allows you to create directories to sign up and sign in users, and to keep your user profiles safe and secure using Amazon Cognito User Pools. User Pools can provide you with a user interface that you can customize to an extend to match it with your app. User Pools also allows easy integration with social identity providers such as Facebook, Google, and Amazon, and enterprise identity providers such as Microsoft Active Directory through SAML.
- Amazon Cognito Federated Identities – Which allows you to control access to your backend resources in AWS and APIs through Amazon Cognito. Thus, users of the application get only the appropriate access. You can map users to different roles and permissions and get temporary AWS credentials for accessing AWS services such as Amazon S3, Amazon DynamoDB, Amazon API Gateway, and AWS Lambda.
Basic Architecture

Like any other access control, the goal is to authenticate your user, and then grant your user access to another AWS service.
- Your app user signs in through a user pool and receives user pool tokens after a successful authentication.
- Next, your app exchanges the user pool tokens for AWS credentials through an identity pool.
- Finally, your app user can then use those AWS credentials to access other AWS services such as Amazon S3 or DynamoDB.
Step-by-Step Instructions: How?
In this section let us see how we can kick start using AWS Cognito in our application. The easiest way will be creating a User Pool with a hosted UI.
Create User Pool
- Go to the Amazon Cognito console. You might be prompted for your AWS credentials.
- Choose Manage User Pools.
- In the top-right corner of the page, choose Create a user pool.
- Provide a name for your user pool and choose “Step through settings” to have a better knowledge on configuration.

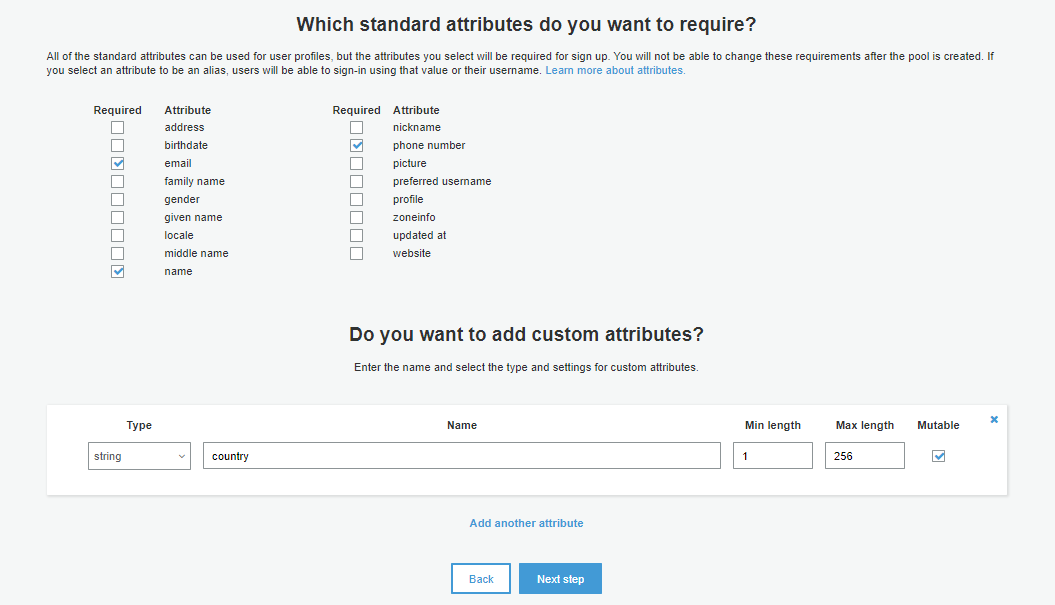
5. Next step is to choose which attributes are required, the system will enforce these required values and we cannot change later. The best method is marking only truly necessary values here as required. We can add custom attributes as well according to our business needs. Choose Next step to save.

6. On the next screen we will configure the policies for the account.
- Password Policy – To configure both the length, requirements such as numbers, special characters, uppercase letters or lowercase letters etc. This policy will be applied for both passwords set by users and administrators.
- User Sign-up Policy – To configure if we want to allow users to sign up themselves as in case of public applications or you want to restrict sign-up for administrators and have the system be invitation-only. We can configure how quickly these system invitations will expire if not used.

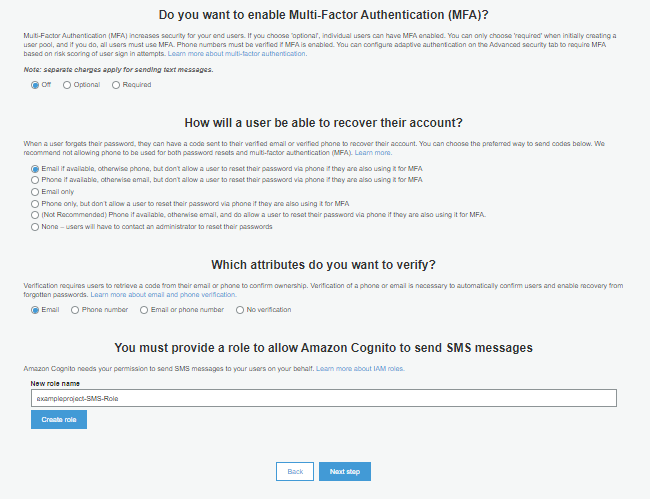
7. In MFA and Verification screen we can set up multi-factor authentication (MFA) along with email and phone verification. This might incur additional charge based on your ISP.

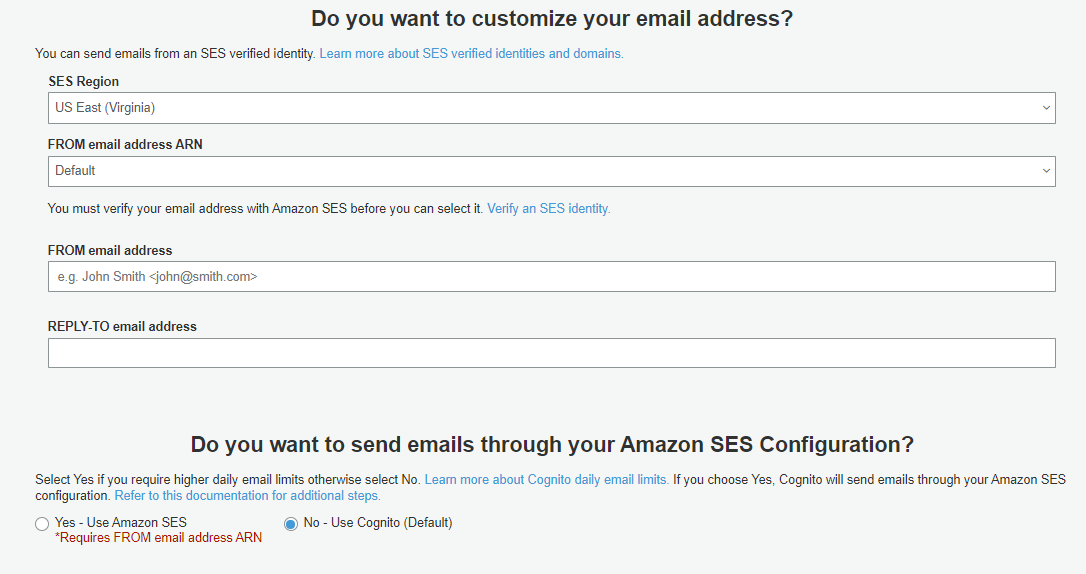
8. On message customization screen we can configure the SMS and Email messages your user pool will send. We can also configure “from” and “reply to” email addresses.

9. Tags can be left as such for new users whereas for seasoned users Tags can be tags used as a way to track our spending and assign permissions with IAM.

10. The Devices screen allows you to determine whether the user pool will keep a note of your user’s devices. This is an added security step that helps us to monitor what devices a specific account has been used. This improves the value of access control mechanism while leveraging multi-factor authentication (MFA). We can configure system not to require an MFA token upon each log-in if the device is recognized.

11. The next step is to define each application that use the user pool.

12. Next, you can configure which user attributes each app can read and write.

13. With triggers, we can link our Lambda functions to completely customize the user lifecycle process. The lifecycle events that we can use are Pre sign-up, Pre authentication, Custom message, Post authentication, Post confirmation, Define Auth Challenge, Create Auth Challenge, Verify Auth Challenge Response, User Migration and Pre-Token Generation

14. Review the user pool information and make any necessary changes. When the information is correct, choose Create pool.
Enable the Hosted Web UI
- In Amazon Cognito console choose the created user pool.
- Choose App clients under General settings from the navigation bar. Create App Client if you haven’t done this step before and note the App Client ID.
- Now go to App client settings from the navigation bar.
- Select Cognito User Pool as one of the Enabled Identity Providers.

5. We need to add a callback URL which the Amazon Cognito server call after users are authenticated. Give the landing page of your application here.
6. Enter a Sign out URL.
7. Next step is to select Auth flow.
- Authorization code grant – This returns authorization code which can be exchanged for user pool tokens. Tokens are less likely to become compromised as they are not directly exposed to users. Need a custom backend to exchange authorization code with user pool tokens.
- Implicit grant – This returns user pool JSON web tokens (JWT). You can use this flow when there’s no backend available to exchange an authorization code for tokens. It’s also helpful for debugging tokens. Used when no backend is available for the exchange
- Client credentials – Only if your app needs to request access tokens on its own behalf, not for the user.

8. Save Changes
9. On the Domain name page, type a domain prefix that’s available.

10. Make a note of the complete domain address.
11. Choose Save changes.
12. Sign in URL will be
https://your_domain/login?response_type=code&client_id=your_app_client_id&redirect_uri=your_callback_url
13. Integrate same with your application.
Ensure Availability on Regional Failures
To ensure the availability of AWS Cognito during regional failures, a recommended approach is to introduce an additional user pool in a separate region with an identical configuration to the primary user pool. By doing so, the system becomes resilient to regional failures, allowing users to seamlessly interact with AWS Cognito even if one region experiences an outage. This redundancy ensures that user authentication and authorization processes can continue uninterrupted, mitigating the impact of regional failures and enhancing the overall availability of the system.


